Sunday, April 22, 2012

Add Two Sidebar Columns below Main Sidebar in Blogger

I have told you about creating three columns in Blogger template. Many of us try to avoid this as it may sometimes look clumsy but we need widget sections to add some blogger gadgets. Now if you want to add two small sidebar columns below main sidebar in your blogger template, then I will tell you how to do it.


So let's start!

First go to Design > Edit HTML and backup your template.

1. Find the below section:


#sidebar-wrapper {

width:220px;

float:right;

word-wrap:break-word;

overflow:hidden;

}


2. And just below it add the following codes:
#right-col {

width:48%;

float:right;

word-wrap:break-word;

overflow:hidden;

}

#left-col {

width:48%;

float:left;

word-wrap:break-word;

overflow:hidden;

}


3. Now find:


<div id='sidebar-wrapper'>

<b:section class='sidebar' id='sidebar' preferred='yes'/>

</div>


4. And add the bold codes or replace the whole code with: 


<div id='sidebar-wrapper'>

<b:section class='sidebar' id='sidebar' preferred='yes'/>

<b:section class='sidebar' id='left-col' preferred='yes'/>

<b:section class='sidebar' id='right-col' preferred='yes'/>

</div>


These bold snippets are added which would actually add two widget sections
 below the main sidebar. Preview your template for any errors and save it.

Update: Some of you are having trouble adding the two small sidebar
columns in their templates and may be getting an XML error. So, here's the solution:
You must be having widgets in your sidebar like:


<div id='sidebar-wrapper'>

<b:section class='sidebar' id='sidebar' preferred='yes'>

< ..widgets here.. >
</b:section>

</div>


 Put the bold codes below </b:section> as shown below:


<div id='sidebar-wrapper'>

<b:section class='sidebar' id='sidebar' preferred='yes'>

< ..widgets here.. >

</b:section>

<b:section class='sidebar' id='left-col' preferred='yes'/>

<b:section class='sidebar' id='right-col' preferred='yes'/>

</div>

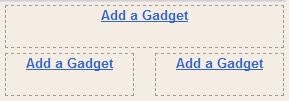
Now go to Design > Page Elements and check for your newly added two
 small sidebars below you main sidebar.
Add Three Columns in Footer to Blogger

Keeping you sidebars clean makes your blog look good. This is where the role of the columns in footer section comes in. Also it will give your blog a new style. For example, see at the bottom of my blog. This simple tutorial will explain how to do create and add three sidebar columns to footer section in Blogger templates.


1. Go to Design > Edit HTML and first backup your template.


2. Move your gadgets/widgets (if any) from the footer section to your sidebar.


3. Find the closing "]]></b:skin>" tag and immediately before this line, add the following styling definitions and properties:


#footer-left {
width: 33%;
float: left;
margin:5px;
text-align: left;
}
#footer-center {
width: 34%;
float: left;
margin:5px;
text-align: center;
}
#footer-right {
width: 33%;
float: right;
margin:5px;
text-align: right;
}
#footer-column-container {
clear:both;
}
.footer-column {
padding:5px;
}


3. Find the codes:


<div id='footer-wrapper'>
<b:section class='footer' id='footer'/>
</div>


And replace this section with the below codes to add three widget sections to blogger footer:


<div id='footer-wrapper'>
<div id='footer-column-container'>
<div id='footer-left'>
<b:section class='footer-column' id='col1' preferred='yes' style='float:left;'/>
</div>
<div id='footer-center'>
<b:section class='footer-column' id='col2' preferred='yes' style='float:left;'/>
</div>
<div id='footer-right'>
<b:section class='footer-column' id='col3' preferred='yes' style='float:right;'/>
</div>
<div style='clear:both;'/>
</div>
</div>


5. Preview for any error and save it. Go to Design > Page Elements, you will find out that you have added three columns in Blogger footer section.

Now move and add some of the widgets there and see how it looks.

How to Create Three Column Blogger Template

You must have seen many blogs having three columns. You may also want to make your own three column Blogger Layout Template and give your blog a new level in style. So let's do it with a simple tutorial.

You can see in Design > Page elements that you already have two column, one for the main body and the other is the sidebar. So you need to create and add an extra sidebar column.

Adding the Third Sidebar Column in Blogger Template


1. Go to Design > Edit Template and backup your template.

2. Find:

#sidebar-wrapper {
width: 220px;
float: $endSide;
word-wrap: break-word; /* fix for long text breaking sidebar float in IE */
overflow: hidden;     /* fix for long non-text content breaking IE sidebar float */
}
 
 
And change float to:
 
 
float: right;
 
 
3. Below it add:
 
#left-sidebar-wrap {
width: 220px;
float: left;
word-wrap: break-word;
overflow: hidden;
}
 
This "float: left" will make the sidebar float to left. Thus you will be having a sidebar to the left of your blogger template.


4. Find and change the width of the outer-wrapper to 900px or more to avoid overlapping of sidebar over the main-wrapper.
 
#outer-wrapper {
width: 660px;
margin:0 auto;
padding:10px;
text-align:$startSide;
font: $bodyfont;
}
 
5. Find #main-wrapper and replace it with:
 
#main-wrapper {
width: 410px;
float: left;
margin:0 20px; 
word-wrap: break-word; /* fix for long text breaking sidebar float in IE */
overflow: hidden; /* fix for long non-text content breaking IE sidebar float */
} 
 

Here a margin to left and right of 20px is added to avoid overlapping of sidebars with the main wrapper. You can change it accordingly to overcome the issue of overlapping of sidebars.

7. Find the section:
 

<div id='main-wrapper'>
 
 
And just before this add:
 
<div id='left-sidebar-wrap'> 
<b:section class='sidebar' id='left-sidebar' preferred='yes'/>
</div>
 
 
8. Save your template and "Wallah", its done. You have created an extra sidebar
   for your Blogger template. 

Now you have to do some adjustments yourselves. Adjust the widths by 
altering the pixels (px) of the "outer-wrapper", "main-wrapper", 
"sidebar-wrapper" and "left-sidebar-wrap". Adjust the margins, paddings 
and width by same way to "header-wrapper" and "footer-wrapper" to match 
the style.

Using Conditional Tags in Blogger

Conditional tags in Blogger are used to tell browsers what to do in certain conditions. It is a great way to do certain things like hiding widgets or gadgets or your share buttons in Blogger. For example, when we use:

<b:if cond='data:blog.pageType == &quot;item&quot;'>
Hello world
<b:else/>
Goodbye Cruel World
</b:if>
 
 
It gives the browser the condition that when it’s an item (post) page then show “Hello world” otherwise, for every other pages show “Goodbye Cruel World”. Interesting, isn’t it.
A conditional tag comes handy when you are designing your Blogger blogs and customizing and editing it from the scratch to take it to the next level. But first you need to know how many types of pages are there in Blogger and then how to use the conditional tags respective to that type of page. In this tutorial I will try to cover most of it, so let’s start.


Type of Pages in Blogger and Conditional Tags to Use

Item Page

It refers to every other page except item (post) pages. The conditional tag:

 
<b:if cond='data:blog.pageType == &quot;index&quot;'>
Hello World
</b:if>
 

Archive Page

It’s for your archive pages in Blogger. The tag will be:

<b:if cond='data:blog.pageType == &quot;archive&quot;'>
Hello World
</b:if>
 

Static Page

For static pages in Blogger it will be:

<b:if cond='data:blog.pageType == &quot;static_page&quot;'>
Hello World
</b:if>
 

For a Particular Page

If you want to do something on a particular page then the conditional tag for it will be:

<b:if cond='data:blog.url == &quot;URL of the page&quot;'>
Hello World
</b:if>
 
The only thing that you have to do is replace “URL of the page” with your
page’s URL which you want to have. 

Homepage only

It's for the homepage only.

<b:if cond='data:blog.url == data:blog.homepageUrl'>
Hello World
</b:if>
 

Alternative Condition

Now suppose you want a conditional tag that alternates every rule. Say, in first example, I showed how to display something only in post pages but just an “!” mark can alternate that condition. For example, when we apply:

<b:if cond='data:blog.pageType != &quot;item&quot;'>
Hello World
</b:if>
 
It will set the condition that it should be shown on every page other than post
page. 


How to Show HTML and JavaScript Codes within Blogger Posts

While writing my blog posts for my readers I noticed that every time I use "<" or ">" signs to show JavaScript or HTML codes and snippets within my Blogger post editor in "Edit HTML" mode, it's not visible. This happens because Blogger post editor recognizes it as snippets that should be used with your blogger template.

So to show JavaScript or HTML codes within Blogger posts or comments, use &lt; instead of < and &gt; instead of >.

Now if there are big codes then go to Plus2net.com and convert your codes.

This is the simplest method to show JavaScript and HTML codes within blog posts.

Create and Add your Own Contact Form to Blogger

If you are a blogger then you must have your own contact form to communicate with your blog readers and visitors. You cannot post your email ID to public because you will get lot of SPAM massages.
Blogger don't give any contact forms for their blogs, so we need to create it and add it ourselves. You can create contact form through Google docs or the simple way is to get it easily from another source.
There are many contact form providers but I will go with Kontactr because it's easy. Register with them and they will give you the code.
Here you can find three types of codes. Let's discuss them.

Ajax Embed Widget Contact Form for Blogger

The first option you will have is the Ajax embed form. Simply copy the code and add it where you want to have your form to be seen. You can also customize the look of it according to your styles by clicking the "Customize" button:


Button Code

It is a text link or a button. When the link is clicked it will direct the user to your contact page which is provided by Kontactr. This can be useful when any person wants to contact you and his browser does not supports JavaScript or you want to use it in any other website, forums, etc.

HTML Embed Contact Form

This is best to use for your blog as it uses no JavaScript. It's based on HTML codes using table form, and can be seen in any Lynx based browsers.

Adding Contact Form to Blogger

Choose any one of the above told ways and after selecting and customizing the type of form you want, copy any one of the code that they will provide to your clipboard.
Now, to add the contact form, create a new post, write ‘when, why, how, etc.’ to contact you, paste the any one of the codes mentioned above and publish it. You will have your own contact form for blogger.

Hiding the Contact Me Page Appearing on Homepage of Blogger

You don’t want the contact page to be viewed on homepage. So while publishing the post, back-date it. For example: today’s date is 7/8/2009, then set the date to 6/25/2009 and then publish it.

Basic Settings for Blogspot

New to Blogger? After creating your blog don't just start blogging because you need to know and configure some settings for your newly created blog on Blogger Platform. From your blogspot dashboard, click “Settings” which will lead you to do some basic settings and tweak your blog.


Under the Settings tab, the first thing you need to do is a basic setup for your blog. So let’s discuss the options.

Blog Tools: Here you can Import your blog, Export to another blog and Delete your blogger blog. It comes handy because you can backup your blog by clicking the “Import blog button”.

Title: Give a title for your blog. It will be better if you choose a title that matches your blog’s niche.

Description (Optional): Don’t forget to give a nice and brief description with some keywords in it. But I prefer to leave it blank as you may don't want to have same description for the posts that you write for SEO reason.

Add your blog to our listing: This will add your blog to Google's blog list. You will also find a navbar on top of your blog which enables you to search and go to next or previous blog that are listed and linked with Blogger.com. If you want others to come to your blog through these options, you may select “Yes” otherwise “No”.

Let search engines find your blog: If you want your blogspot blog to be found by the search engines then select “Yes” otherwise “No” if you want to blog privately.

Show Quick Editing on your Blog: This option will let you to automatically add a quick edit icon to your blog posts after they are published. Only you can see this button after logging in to your blogger account. This allows you to quickly edit your post form your blog directly.

Show Email Post links: Select “Yes” if you want to add a small “Email to Friends” button beneath your blog posts.

Adult Content: Select “Yes” if your blog contains adult content which will ask you blog viewers to confirm that they want to proceed to your blog, otherwise “No”.

Now comes to Global Settings that will be applied to all of your blogs.

Select post editor: There you will find “Updated editor”, “Old editor” and “Hide compose mode” which will not contain WYSIWYG editor. You may like to select the updated editor because it’s easy to write and format your posts accordingly.

Enable transliteration: If enabled, it will let you add a toolbar to the editor to convert English language to users selected language.

At last, save your basic settings for your blog.

Create Your Own Free Blog with Blogger


Launched in 1999, Blogger, a Google Service, is a great way to create your own blog for a starter. Blogger is totally free with free hosting.
Blogger is for:

  1. To share your thoughts, photos, and more with friends and world.
  2. Easy to post text, photos, and videos from the web or your mobile phone.
  3. Unlimited flexibility to personalize your blog with themes, gadgets, and more.
First we going to learn how to create your own blog with some simple steps below:

Step 1: Sign Up with Google for an Account

You need a Google account to create your blog on Blogger. If you already have one then you need not to create a new account, just follow the below steps.

Step 2: Go to Blogger.com and Sign In

 Step 3: Choose your Display Name

Step 4: Choose you Blog Title and Address wisely

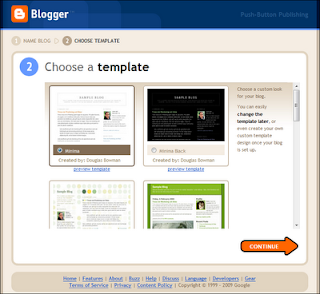
Step 5: Choose your Template


Step 6: Start Blogging.


Tutorials for Blogger

I have made a list of Blogger tutorials that are posted in my blog. You can find many tutorials on editing and customizing Blogger templates and make your blog unique and beautiful. So let's browse through what can we find.


  • Blogger basics
  • Before Editing your Template
  • Editing Templates
  • Tips, Tricks and Hacks
  • Bookmaking Codes
  • Blogger Widgets
  • Facebook Guides
  • Twitter Guides
  • SEO Tips
  • Need more? 

Blogspot Basics

Starter's guide.

Things to Know Before Editing Your Template

 Designing Your Blogger Template and Customizing It

Here are some of the tutorials to customize your template and design your blog.

Tips, Tricks and Hacks

Some interesting tips, tricks and hacks that you may want.

  • Customize the Read more Option - New Feature from Blogger
  • Add "Read more" Option - Officially from Blogger
  • Hide or Auto Hide Blogger Navbar
  • Show Blogger Gadgets on Specific and Particular Pages
  • Highlight Author and Administrator Comments in Blogger

Bookmarking Codes

Are you social? Have you added social bookmarking icons?

  • Add Social Bookmarking Icons below Blogger Posts (Unofficial and with 18 bookmarking sites)
  • Add Sexy Social Bookmarks v2 to Blogger (New one)
  • Add Sexy Social Bookmarks to Blogger
  • Official Button Counters

Blogger Widgets

Some of useful and interesting widgets.

  • Related Posts and Recent Posts Widget with Image Thumbnail
  • Add Floating Share Buttons Like Mashable to Blogger
  • Add Tabs to Sidebar in Blogger
  • Most Commented Posts Widget for Blogger
  • Google Translate Widget with Flags
  • Popular Posts Widget for Blogger - Official

Facebook Guides

A great way to increase audience for your blog.
  • Create Facebook Like Page for your Blog
  • Add Facebook Like Box to Blog
  • Add Facebook Like Button to Blogger
  • Add Facebook Send Button to Blogger
  • Facebook XFBML Tutorials

Twitter for Blogger

Get into news, follow Twitter bird.
  • Automatically Add Blog Posts to Twitter
  • Increase Followers on Twitter
  • Add and Customize Retweet Button
  • Add Floating Follow Me on Twitter Icon Button to Blogger
  • Add Tweet Button to Blogger - Official

SEO and Traffic Tips

Some tips and tutorials for you to increase traffic to your blog and also some 'must read' SEO articles.

  • Submit Blogger Sitemap to Google Webmasters
  • Optimize Your Blogger Blog to Load Faster
  • Get Your Blog Indexed Quickly
  • On-Site Optimization Guide
  • Off-line Optimization Guide


Bandarban Wallpaper 2

Bandarban Wallpaper
Bandarban Wallpaper 12

Bandarban Wallpaper
Bandarban Wallpaper 13

Bandarban Wallpaper
Bandarban Wallpaper 14

Bandarban Wallpaper
Bandarban Wallpaper 15

Bandarban Wallpaper
Bandarban Wallpaper 16

Bandarban Wallpaper
Bandarban Wallpaper 17

Bandarban Wallpaper
Bandarban Wallpaper 18

Bandarban Wallpaper
Bandarban Wallpaper 19

Bandarban Wallpaper
Bandarban Wallpaper 20

Bandarban Wallpaper
Bandarban Wallpaper 21

Bandarban Wallpaper
Bandarban Wallpaper 22

Page(2 of 2)  Prev  1 2   

Bandarban in Bangladesh Wallpaper

Bandarban Wallpaper
Bandarban Wallpaper 1

Bandarban Wallpaper
Bandarban Wallpaper 2

Bandarban Wallpaper
Bandarban Wallpaper 3

Bandarban Wallpaper
Bandarban Wallpaper 4

Bandarban Wallpaper
Bandarban Wallpaper 5

Bandarban Wallpaper
Bandarban Wallpaper 6

Bandarban Wallpaper
Bandarban Wallpaper 7

Bandarban Wallpaper
Bandarban Wallpaper 8

Bandarban Wallpaper
Bandarban Wallpaper 9

Bandarban Wallpaper
Bandarban Wallpaper 10

Bandarban Wallpaper
Bandarban Wallpaper 11

Page(1 of 2)  1 2   Next

Cox's Bazar Sea Beach In Bangladesh Wallpaper 2

Cox's Bazar Sea Beach In Bangladesh Wallpaper
Cox's Bazar Sea Beach 13

Cox's Bazar Sea Beach In Bangladesh Wallpaper
Cox's Bazar Sea Beach 14

Cox's Bazar Sea Beach In Bangladesh Wallpaper
Cox's Bazar Sea Beach 15

Cox's Bazar Sea Beach In Bangladesh Wallpaper
Cox's Bazar Sea Beach 16

Cox's Bazar Sea Beach In Bangladesh Wallpaper
Cox's Bazar Sea Beach 17

Cox's Bazar Sea Beach In Bangladesh Wallpaper
Cox's Bazar Sea Beach 18

Cox's Bazar Sea Beach In Bangladesh Wallpaper
Cox's Bazar Sea Beach 19

Cox's Bazar Sea Beach In Bangladesh Wallpaper
Cox's Bazar Sea Beach 20

Cox's Bazar Sea Beach In Bangladesh Wallpaper
Cox's Bazar Sea Beach 21

Cox's Bazar Sea Beach In Bangladesh Wallpaper
Cox's Bazar Sea Beach 22

Cox's Bazar Sea Beach In Bangladesh Wallpaper
Cox's Bazar Sea Beach 23

Cox's Bazar Sea Beach In Bangladesh Wallpaper
Cox's Bazar Sea Beach 24

Page(2 of 2)  Prev  1 2  

Cox's Bazar Sea Beach In Bangladesh Wallpaper

Cox's Bazar Sea Beach
Cox's Bazar Sea Beach 1

Cox's Bazar Sea Beach
Cox's Bazar Sea Beach 2

Cox's Bazar Sea Beach
Cox's Bazar Sea Beach 3

Cox's Bazar Sea Beach
Cox's Bazar Sea Beach 4

Cox's Bazar Sea Beach
Cox's Bazar Sea Beach 5

Cox's Bazar Sea Beach
Cox's Bazar Sea Beach 6

Cox's Bazar Sea Beach
Cox's Bazar Sea Beach 7

Cox's Bazar Sea Beach
Cox's Bazar Sea Beach 8

Cox's Bazar Sea Beach
Cox's Bazar Sea Beach 9

Cox's Bazar Sea Beach
Cox's Bazar Sea Beach 10

Cox's Bazar Sea Beach
Cox's Bazar Sea Beach 11

Cox's Bazar Sea Beach
Cox's Bazar Sea Beach 12

Page(1 of 2) 1 2  Next
Related Posts Plugin for WordPress, Blogger...